If you’ve been brooding chicks already you are probably already familiar with the traditional heat lamps with red bulb that are often used to keep the chicks warm. They are easily acquired at any feed store during chick season and simple to use. However, they come with several drawbacks.
- They are dangerous. Heat lamps emit a lot of heat and are attached by a simple clamp that can easily be jostled when you aren’t there to notice.
- Heat lamps often rely on light bulbs. Baby chicks need to sleep and light sources can be distracting to their sleep cycle.
- Heat lamps are not temperature controlled, except by you raising or lowering the bulb. If you are away from home and your home AC or heat fails, you don’t always know about it until it is too late to adjust the light in the brooder box.
All of these are the reasons why we decided to go with a dedicated, box mounted heat emitter. A heat emitter is a ceramic device that screws into a traditional light receptacle.
You CAN use it in a heat lamp but we have chosen to mount ours in the brooder box and control it by using a temperature controller designed for reptile terrariums. The controller keeps the heat emitter at the desired temperature. It turns it off if the temperature goes above the set limit and turns it on if it goes below that limit.
Now we don’t have to worry about our chicks getting cold if the household heat system goes out when we’re in town shopping or too warm if the AC goes out.
If you’d like to see how we attached our heat emitters to our brooders, you can watch our video on Youtube or read our step-by-step directions below.
 Materials:
Brooder box
3/4″ Forstner bit
1/16″ drill bit
Drill
Receptacle
Heat emitter
Bolts and nuts to fit your receptacle mounting holes
Extension cord
Wire stripper
Screw driver (might be a Phillips’ head, check back of receptacle)
Reptile Terrarium Temperature Controller
Marker or pen
Step 1:
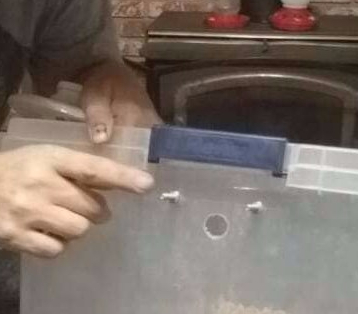 Find the top center of the end of your brooder. Hold your receptacle up to the location that you want to mount it and mark the mounting holes on the outside of your brooder through the holes and onto the box.
Find the center point of these two marks and mark a point one inch below that.
Step 2:
Ensure the lid is secure to give your brooder box rigidity. With your drill bits, drill the two mounting holes.
Step 3:
Keep the lid on the brooder box and replace the drill bit with the Forstner bit. Drill a 3/4″ hole in the center mark. This will be used to push electrical cord through later.
 Step 4:
Cut the female end off of the extension cord, leaving the plug intact. Separate the two sides of the extension cord and strip 1-1 1/2 inches of insulation of both sides using your wire strippers.
Step 5:
Thread the bare ends of the cord through the outside of the 3/4″ hole to the inside of the brooder box. Attach the bare ends of the wire to the screws on the receptacle and screw them down tightly. Cut off the extra wire to ensure they do not make contact with one another.
Step 6:
 Attach the receptacle to the brooder box with the bolts and nuts. Install the heat emitter.
Step 7:
Plug the end of the extension cord into the Reptile Terrarium Temperature Controller. Adjust the controller to the desired temperature and insert the probe into the brooder.
You are done!
Now you just have to add your bedding, food, water, and chicks.
If you enjoyed this tutorial, please comment below. If you’ve done something different with your brooder heating set-up, please share it with us. We’d love to see what you’re doing.